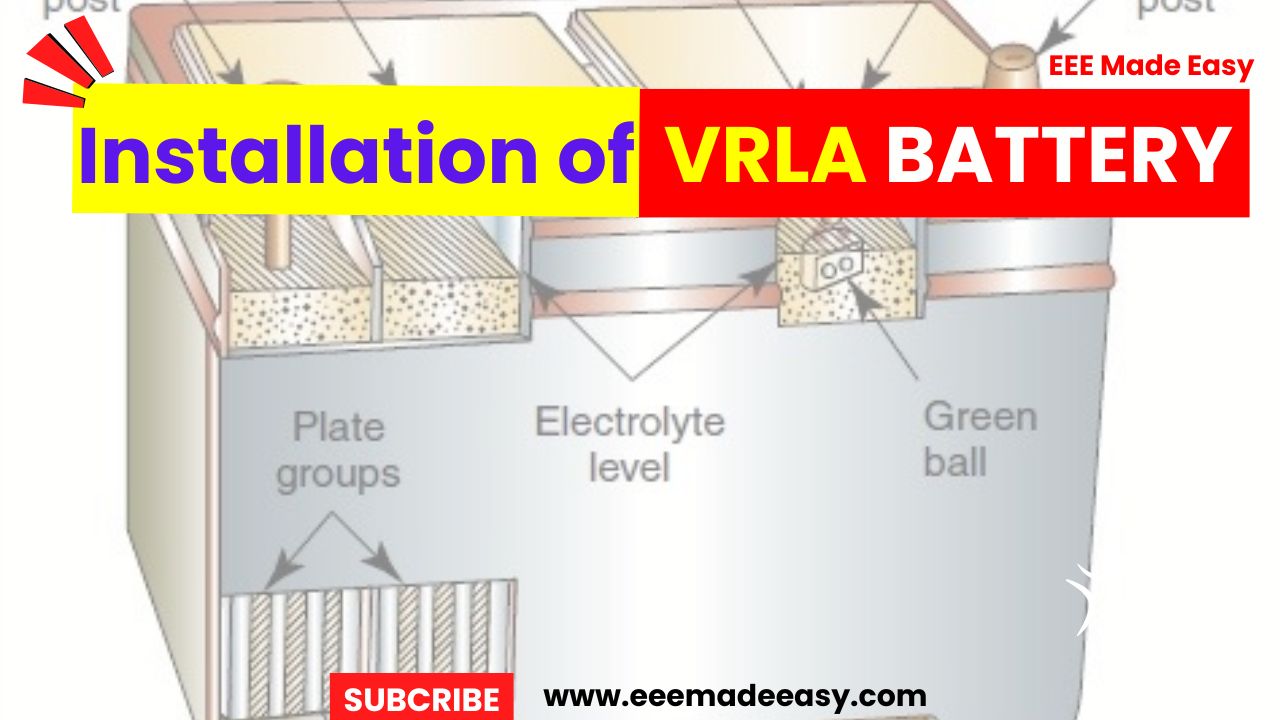
VRLA Battery Installation: As you aleady learned What is a VRLA Battery, and how to store VRLA Batteries, lets read about VRLA battery installation in detail in this post.
Installation of VRLA Batteries
For installation of VRLA batteries, the following instructions should be followed.
- Location
- Ventilation
- Floor arrangement
Read Also: VRLA Battery|Valve Regulated Lead Acid Battery
Location for VRLA Battery Installation
- Install the battery in a clean, cool and dry location, an ideal temperature being 27° C.
- Free space of one meter should be provided on all sides of the battery for carrying out periodic checks.
Ventilation for VRLA Battery Installation
Under normal operating conditions, natural ventilation is adequate.
Floor arrangement for VRLA Battery Installation
For the purpose of stacking the batteries the floor mounting channels have holes with diameter 13 mm for anchoring, these channels can be anchored to the floor with the help of suitable bolts.
For preparation of floor anchoring the following instruction may be adopted.
- Carefully mark the location and install the floor anchors to match the holes in the floor mounting channels.
- Check that the floor mounting channels are in the correct position and at a uniform level.
- Tighten the bolts to anchor the floor mounting channels.
- Use shims for leveling.
- Check that the floor is capable of with standing the weight of the batteries.
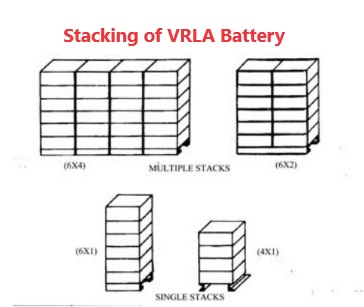
- The recommended stacking limitations are as under.
| Sl no | Module arrangement | Maximum modules |
|---|---|---|
| 1 | Horizontal single stack | 8 High |
| 2 | Horizontal multiple stack | 8 High |
Batteries are to be stacked in horizontal position with single stacks or multiple stacks as shown in the fig below.
Read Also: VRLA Battery|Valve Regulated Lead Acid Battery
Module stacking of VRLA Batteries
- Place the first module on the floor mounting channels after checking the position of the terminals as per the wiring diagram (Red washer indicates positive terminal and blue washer indicates Negative terminal).
- Align the holes and securely bolt the module to the floor mounting channels as shown in the fig below
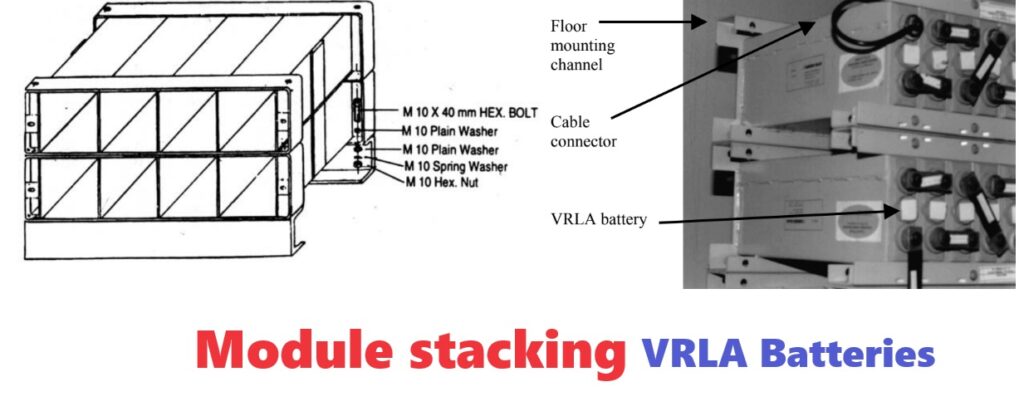
- Securely bolt each module before placing the next module in position.
- Use a torque of 30 Numbers for tightening the M-10 (10 mm metric size) bolts.
- Place additional modules as per the wiring diagram.
Connections of VRLA Batteries
- All module terminals are brushed at the factory. Bolts and washers used for fastening are installed finger tight.
- Remove only his hardware and clean it with clean-dry cloth. Using a brass brush, brighten copper terminal surfaces to insure connections with least resistance.
Inter module connections of VRLA Batteries
♦ Assemble the inter module connectors as per the wiring diagram with the help of the insulated tools. The inter module connections are shown in figure
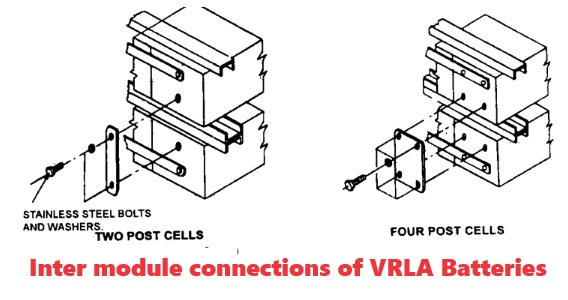
♦ It is recommended when installing connectors on horizontal arrangements, that the upper bolts be installed first to reduce accidental shorting.
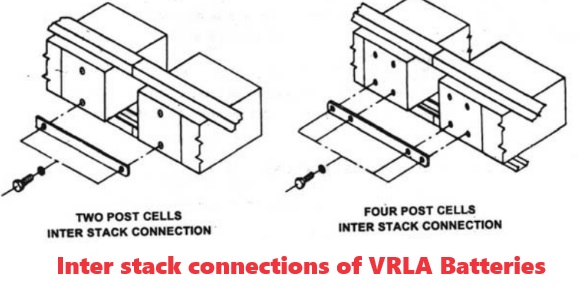
Inter stack connections of VRLA Batteries
♦ Multiple horizontal stacks side by side are interconnected as shown in figure below.
Connections torque of of VRLA Batteries
♦ When module connections are made, tighten all the connections to the torque of 11 N-m.
♦ When inter-cell connections are made at factory, the connections should be checked for torque to 11 N-m.
Checking of connections of VRLA Batteries
♦ Visually check to see that all module terminals are connected from positive (+) to negative (-) through the battery.
♦ Measure the total open circuit voltage between the two terminals. This should be 2.13 to 2.20 Volts times the number of cells in the system.
♦ Apply a thin film of petroleum jelly to prevent oxidation.
VRLA Battery Price
VRLA Battery price ranges from 500 Rs to 5600 Rs depending on the brand, features and quality. Some Examples are given below.
Join EEE Made Easy Whatsapp Channel
Latest Posts
Latest Posts in EEE Made Easy
- Energy Efficient Lamps|CFL, LED lamps
 Energy Efficient Lamps: CFL (Compact Fluorescent lamp ) and LED (light emitting diodes) lamp are Energy Efficient Lamps. Energy Efficient … Read more
 - [New] AE KWA Kerala PSC 2026AE KWA Kerala PSC 2026: DETAILED SYLLABUS FOR SELECTION TO THE POST OF ASSISTANT ENGINEER IN KERALA WATER AUTHOERITY AE … Read more
- [New] Electricity Worker KSEB Syllabus 2026|021/2026 Syllabus Kerala PSCElectricity Worker KSEB Syllabus 2026- 021/2026 Syllabus Kerala PSC: DETAILED SYLLABUS FOR THE POST OF ELECTRICITY WORKER IN KERALASTATE ELECTRICITY … Read more
- [Latest]KWA Operator Syllabus 2026|734,735/2025 Kerala PSC syllabusKWA Operator Syllabus 2026 – 734,735/2025 Kerala PSC syllabus: KERALA PUBLIC SERVICE COMMISSIONDETAILED SYLLABUS FOR THE POST OF OPERATOR (DIRECT) … Read more
- [New]Inspector of Legal Metrology Syllabus|613/2025 Kerala PSC SyllabusInspector of Legal Metrology Syllabus– 613/2025 Kerala PSC Syllabus: DETAILED SYLLABUS FOR THE POST OF INSPECTOR OF LEGAL METROLOGY IN … Read more
- [PDF]IE Rules|Indian Electricity Rules 1956IE Rules:The Indian Electricity Rules 1956 was made under section 37 of the Indian Electricity Act, 1910 and redefined after … Read more
- [Latest]Syllabus Sub Engineer LSGD Electricity Wing Thrissur Corporation| 770/2025 Syllabus Kerala PSCSyllabus Sub Engineer LSGD Electricity Wing Thrissur Corporation: DETAILED SYLLABUS FOR THE POST OF SUB ENGINEER IN LSGD(ELECTRICITY WING OF … Read more